Webinar-like Meetings
Zoom Meeting Rooms come standard with features that often meet the capacity and performance needs of the host user. We occasionally receive requests for Zoom Webinar licenses from users looking to limit audience participation or hide audience identity information. Fortunately, standard Zoom Meeting Rooms can be configured to closely match these audience-management features, eliminating the need to request a Webinar license. Read more below for specific instructions on how to easily adjust your Zoom Meeting Room settings.
If at any point you need assistance with Zoom host basics, detailed instructions can be found here.
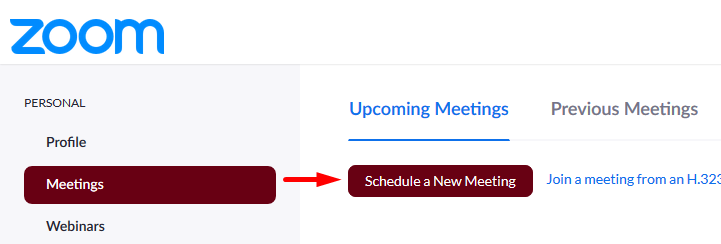
1. Schedule a New Meeting (Zoom web portal)
Navigate to luc.zoom.us and log in to Zoom.
Select the Meetings tab found in the left-side navigation panel under Personal.
Select the button that says Schedule a New Meeting.

2. Disable participant video (Zoom web portal)
After you have specified the meeting topic name, description, date/and time information, scroll down the page. Pause when you see the setting for Video. Change the setting to match:
Video – Participant: “off”

This setting makes sure that when participants join your meeting, the video feed from their webcams will be initially deactivated. This setting does not disable their video capabilities altogether. We recommend communicating to your participants in advance that enabling their video is discouraged.
Note: Once these settings have been adjusted, they will apply to all scheduled Zoom meetings in the future, as seen in the image below. Keep this in mind if you would like to revert these adjustments down the road.

3. Disable participant audio - Step 1 (Zoom web portal)
Continue to scroll down until you locate the Meeting Options section. The setting for Mute participants upon entry should be checked as shown in the image below.

Note: While unrelated to participant audio, we recommend the following settings for your meeting:
- Enable join before host - unchecked
- Enable waiting room - checked
- Record the meeting automatically - checked, 'In the cloud'
These settings ensure:
- Participants cannot interact with others before the host has officially started the Meeting
- Participants will have a waiting room if they happen to join the meeting before the host
- By setting Zoom to record the meeting automatically, you eliminate any risk of forgetting to record the meeting
- Recording the meeting 'in the cloud' removes any worry that the video will be kept on just one computer after the session ends
The remaining steps must be completed in your Zoom Meeting Room from the Zoom Desktop Application. We suggest joining your meeting at least 15 minutes before it begins for sufficient time to adjust these settings.
If you need assistance with the Zoom Desktop Application, you will find detailed instructions here.
4. Disable participant audio - Step 2 (desktop application)
After you've signed on to the Zoom desktop application and joined your meeting, select the Manage Participants button. This will open a new panel on the right side of your window.

At the bottom of the panel, you will find three audio options. Select the More button.

A smaller window will appear. These are settings should look familiar since you have already adjusted them on luc.zoom.us. Double-check to make sure they match the settings in the image below.
.png)
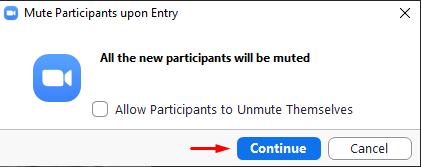
Once you confirm these settings, you may see a window confirming your mute settings. Confirm that Allow Participants to Unmute Themselves is unchecked. Select Continue.

5. Limit participant chat to "Q&A" (desktop application)
From your Zoom Meeting window, select the Chat button. This will open a new panel to the right side of your window.

At the bottom of the panel, you will find the chatbox. To the right of the chatbox, you will see a button with an ellipsis. Select this button.

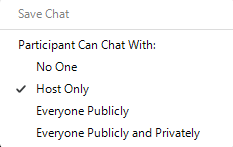
Selecting this button will open a short menu of options. For the setting, Participants Can Chat With, select Host Only. This setting will prevent participants from both messaging the entire audience and privately chatting with one another. Participants are still able to message the host individually, which functions perfectly if you would like to facilitate a Q&A session as part of your meeting.

If you find that you still have questions regarding Zoom host controls, a great resource with additional information can be found here.
Meeting Room Security Considerations
There are several features and considerations that can be enabled or utilized on-the-fly during your meetings to help ensure security, prevent unwanted guests, or just otherwise enable a streamlined experience for all in attendance.
Your Personal Settings
Login to luc.zoom.us and on the left-hand side, select Settings. Consider reviewing all settings to see what might be interesting for you, many will serve as 'default' settings when creating future meetings. Some notable features include:
- Polling - allows the ability to create polls for your meeting in advance, or on-the-fly during your meetings you host.
- Always Show Meeting Control Toolbar - avoid losing sight of the toolbar during screen shares, so you can quickly access features like the in-meeting Security, Participants list and Chat, for example.
- Waiting Room - Create custom "waiting room" messages for either guests (not signed into Zoom) or all participants joining your meeting. A great way to admit individuals in first, who may be presenting/speaking, while others observe.
When Creating A Meeting
When creating a meeting via luc.zoom.us, or the desktop application, consider the following settings depending upon your meeting:
- Require Registration - After you 'create' the meeting, settings will be visible to customize so you require everyone to register to attend. This affords flexibility of a registration and attendee report (and seeing who wasn't able to attend). You can also ask custom questions from your audience members.
- Enable Meeting Password - Meeting passwords can be up to 10-characters in length. This will significantly reduce risks of unwanted guests guessing your Meeting ID and joining.
- Disable Join Before Host. If enabled and Alternative Hosts are selected, the first to join will have full Host capabilities.
- Enable Mute Participants upon entry - Avoid participants joining with their microphones on, where there might be risk of audio feedback or noises from their location.
- Enable Waiting Room - Another great way to anticipate and see who wants to join, before they can automatically. You can "Admit" participants in one at a time, or "Admit All". They'll see your custom Waiting Room message, if you enabled this in your settings.
- Enable Only authenticated users can join - This means the user must have a registered Zoom account and email. Similarly reducing risks of unwanted guests who join without a registered Zoom account.
- Add Alternative Hosts as necessary - these colleagues can host the meeting without you present (though you can't be in a concurrent meeting), empowering them to share screen or assist with Security or settings functions during your meeting.
After you Save your meeting, note that the meeting itself will allow you to further access features like Registration (if it was enabled), or edit it at any point to change a Meeting Password, reschedule, or update settings.
If Registration was enabled, after saving scroll to the bottom to locate further settings:
- Beside the Registration Options section, click Edit to modify registration features, such as changing it to manual approvals, sending you an email upon each registration, enable additional registration questions, or add custom ones which you can select which are optional and which are required. This can afford more insights into your anticipated audience.
During Your Meeting (Security)
After joining, consider monitoring or adjusting the following settings as needed during your meeting via the Security section.
- Lock Meeting - prevent any other users from joining
- Waiting Room - disable/enable as needed
- Allow Participants to:
- Share Screen - off by default, limited to Host/Co-Hosts only.
- Chat - enabled by default, disabling it will still allow Hots/Co-Hosts to chat.
- Rename Themselves - Useful to change name with preferred pronouns, department information, but can be disabled if participants are observed using it inappropriately.
- Unmute Themselves - Unchecking this will prevent any non-Host/Co-Host from unmuting themselves. Host/Co-Hosts can continue to be use audio easily, and can individually select Participants to "Ask to Unmute" if you'd like to enable individuals the ability to speak.
- Report & Remove:
- Remove Participant... - select the participant to remove. If used, consider Locking Meeting afterward to prevent other disruptive users from joining.
- Report - A form will appear that will notify the Zoom vendor and give permission to access all meeting report data and investigate issues further.
Note that you can also select individuals to Put In Waiting Room. This can be helpful in meetings with sensitive information, or to move disruptive individuals also preventing the user's ability to return or hear/see the meeting further. Participants in the waiting room can always be admitted back in at any point.
Other Tips
- Consider taking advantage of Share Screen to have Slides or Video visible to serve as the primary means for relaying information. In doing so, only those with audio capability will show up in the associated gallery view as they talk.
- Consider utilings Polls further to survey your audience and participants, help solicit feedback, or make decisions and gain insights.
- Consider using Breakout Rooms for sub-group meetings and activities.
- Consider using Reactions or Raise Hand as non-verbal communication or engagement from the audience.
Zoom Meeting Rooms come standard with features that often meet the capacity and performance needs of the host user. We occasionally receive requests for Zoom Webinar licenses from users looking to limit audience participation or hide audience identity information. Fortunately, standard Zoom Meeting Rooms can be configured to closely match these audience-management features, eliminating the need to request a Webinar license. Read more below for specific instructions on how to easily adjust your Zoom Meeting Room settings.
If at any point you need assistance with Zoom host basics, detailed instructions can be found here.
The remaining steps must be completed in your Zoom Meeting Room from the Zoom Desktop Application. We suggest joining your meeting at least 15 minutes before it begins for sufficient time to adjust these settings.
If you need assistance with the Zoom Desktop Application, you will find detailed instructions here.
If you find that you still have questions regarding Zoom host controls, a great resource with additional information can be found here.
Meeting Room Security Considerations
There are several features and considerations that can be enabled or utilized on-the-fly during your meetings to help ensure security, prevent unwanted guests, or just otherwise enable a streamlined experience for all in attendance.
Your Personal Settings
Login to luc.zoom.us and on the left-hand side, select Settings. Consider reviewing all settings to see what might be interesting for you, many will serve as 'default' settings when creating future meetings. Some notable features include:
- Polling - allows the ability to create polls for your meeting in advance, or on-the-fly during your meetings you host.
- Always Show Meeting Control Toolbar - avoid losing sight of the toolbar during screen shares, so you can quickly access features like the in-meeting Security, Participants list and Chat, for example.
- Waiting Room - Create custom "waiting room" messages for either guests (not signed into Zoom) or all participants joining your meeting. A great way to admit individuals in first, who may be presenting/speaking, while others observe.
When Creating A Meeting
When creating a meeting via luc.zoom.us, or the desktop application, consider the following settings depending upon your meeting:
- Require Registration - After you 'create' the meeting, settings will be visible to customize so you require everyone to register to attend. This affords flexibility of a registration and attendee report (and seeing who wasn't able to attend). You can also ask custom questions from your audience members.
- Enable Meeting Password - Meeting passwords can be up to 10-characters in length. This will significantly reduce risks of unwanted guests guessing your Meeting ID and joining.
- Disable Join Before Host. If enabled and Alternative Hosts are selected, the first to join will have full Host capabilities.
- Enable Mute Participants upon entry - Avoid participants joining with their microphones on, where there might be risk of audio feedback or noises from their location.
- Enable Waiting Room - Another great way to anticipate and see who wants to join, before they can automatically. You can "Admit" participants in one at a time, or "Admit All". They'll see your custom Waiting Room message, if you enabled this in your settings.
- Enable Only authenticated users can join - This means the user must have a registered Zoom account and email. Similarly reducing risks of unwanted guests who join without a registered Zoom account.
- Add Alternative Hosts as necessary - these colleagues can host the meeting without you present (though you can't be in a concurrent meeting), empowering them to share screen or assist with Security or settings functions during your meeting.
After you Save your meeting, note that the meeting itself will allow you to further access features like Registration (if it was enabled), or edit it at any point to change a Meeting Password, reschedule, or update settings.
If Registration was enabled, after saving scroll to the bottom to locate further settings:
- Beside the Registration Options section, click Edit to modify registration features, such as changing it to manual approvals, sending you an email upon each registration, enable additional registration questions, or add custom ones which you can select which are optional and which are required. This can afford more insights into your anticipated audience.
During Your Meeting (Security)
After joining, consider monitoring or adjusting the following settings as needed during your meeting via the Security section.
- Lock Meeting - prevent any other users from joining
- Waiting Room - disable/enable as needed
- Allow Participants to:
- Share Screen - off by default, limited to Host/Co-Hosts only.
- Chat - enabled by default, disabling it will still allow Hots/Co-Hosts to chat.
- Rename Themselves - Useful to change name with preferred pronouns, department information, but can be disabled if participants are observed using it inappropriately.
- Unmute Themselves - Unchecking this will prevent any non-Host/Co-Host from unmuting themselves. Host/Co-Hosts can continue to be use audio easily, and can individually select Participants to "Ask to Unmute" if you'd like to enable individuals the ability to speak.
- Report & Remove:
- Remove Participant... - select the participant to remove. If used, consider Locking Meeting afterward to prevent other disruptive users from joining.
- Report - A form will appear that will notify the Zoom vendor and give permission to access all meeting report data and investigate issues further.
Note that you can also select individuals to Put In Waiting Room. This can be helpful in meetings with sensitive information, or to move disruptive individuals also preventing the user's ability to return or hear/see the meeting further. Participants in the waiting room can always be admitted back in at any point.
Other Tips
- Consider taking advantage of Share Screen to have Slides or Video visible to serve as the primary means for relaying information. In doing so, only those with audio capability will show up in the associated gallery view as they talk.
- Consider utilings Polls further to survey your audience and participants, help solicit feedback, or make decisions and gain insights.
- Consider using Breakout Rooms for sub-group meetings and activities.
- Consider using Reactions or Raise Hand as non-verbal communication or engagement from the audience.
